
Use the search function (ctrl + F or equivalent) to find instructions for your species!
See this link for the blocks currently for sale if you want to buy another or send one to a friend <3
_________________________________________________________________________________________
*CAUTIONS AND CONSIDERATIONS FOR READY-TO-FRUIT BLOCKS- MMM is not responsible for any issues that arise from these kits including health issues. Please see considerations below.
IF YOU PLAN ON CONSUMING YOUR HOME-GROWN MUSHROOMS MAKE SURE TO COOK THEM THOROUGHLY*. IF IT IS YOUR FIRST TIME EATING A SPECIES, IT IS BEST TO START WITH A SMALL AMOUNT TO SEE HOW YOUR BODY RESPONDS!
Please be mindful of Winecap identification from outdoor beds. There is always a chance for other species to grow out of the bed. You are responsible for what is put in your body, make sure you are picking and eating Winecap. I strongly recommend looking at a guide and looking at photos on the internet to correctly identify. Wikipedia is a good source to start.
*RED REISHI & TURKEY TAIL ARE NORMALLY PREPARED IN A TINCTURE OR TAKEN AS A SUPPLEMENT WHEN GROUND AND DRIED.
MUSHROOMS PRODUCE SPORES AS THEY DEVELOP. THIS IS A NATURAL MEANS OF REPRODUCTION FOR THE FUNGUS. THEY USUALLY APPEAR AS A DUSTY SURFACE ON YOUR GROW KIT BENEATH THE MUSHROOM CAPS. PEOPLE WITH ALLERGIES OR COMPROMISED IMMUNE SYSTEMS MAY WANT TO CONSIDER PUTTING FRUITING MUSHROOM KITS OUTDOORS OR IN A WELL-VENTILATED AREA AS AIRBORNE SPORES SOMETIMES CAUSE RESPIRATORY IRRITATION. SPORES MAY ALSO CAUSE IRRITATION FOR SOME NON-ALLERGIC OR IMMUNE COMPROMISED MUSHROOM GROWERS, THOUGH THIS IS RARE. HARVESTING MUSHROOMS WHILE STILL IN THEIR YOUNGER GROWTH STAGES WILL REDUCE THE OVERALL SPORE LOAD.
_________________________________________________________________________________________
Black Pearl Oyster Block- Instructions for use:
This information is specific to Black Pearl Oyster.
- Check your block upon arrival to make sure there are no tears or signs of mold from shipping. If the block has broken into pieces during shipping, gently press the block together and let sit 4-7 days undisturbed (ideally in the dark) before moving to step 2.
- Slice a 1-2″ slit into the bag or a 1″ “X” into the side of the block. Be careful not to cut into the block itself and just cut the plastic. If there are trapped mushroom ‘pins’ under the plastic, consider making the cut so they can grow out.
- Fold down the top of the bag and deflate the block, tape the top down so that there is minimal room between the block and plastic except where the cut was made.
- Place the Ready-to-Fruit block in the most humid part of your home (not in direct sunlight) or in a grow chamber or grow tent. The kitchen is a good household place in lieu of a dedicated fruiting chamber. Black Pearl oyster fruits best between 60-75°F but can fruit in the 50’s.
Search online for easy to make fruiting chambers: monotubs, shot gun fruiting chambers (SGFCs) and tents with foggers/humidifiers are all great options and will likely increase success in fruiting and producing healthy fruits. Even a trash bag with plenty of holes can be used to increase humidity! If the Black Pearl oysters are produced in a fruiting chamber with less air exchange, they will have large stems and small caps similar to a king oyster. - 2X daily (or more if your environment is dry) spritz the plastic with filtered/distilled water where the cut was made and look for mushroom “pins”. These are the start of mushrooms! Pins should take ~1-2 weeks to develop from the time of opening the bag.
- Continue to mist the fruits and plastic while they grow. Black Pearl Oysters are usually ready to harvest 5-10 days after pins form and should be harvested before the caps flatten out or become concave for tastiest results (see below for example).
- Cut the mushroom cluster from the block and enjoy for your next meal!
- Soak the block in fresh, cold, distilled/filtered water for 1-6 hours while inside the bag (pour into the opening) and then drain
- Put block back into fruiting conditions, you should get at least 1 more “flush” of mushrooms from the block. If pins do not form at the cut site, consider opening the plastic at the site of the largest set of pins for subsequent flushes and sealing the original site with tape.

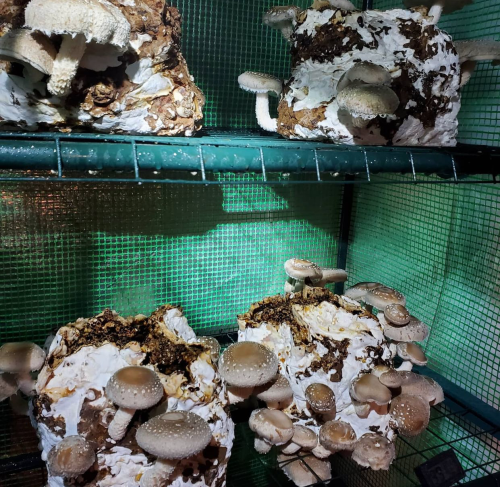
Fruited from 50-60°F in modified monotub with King Oyster thick stem phenotype.
Same block as above but second flush, also fruited from 50-60°F in modified monotub with more of a canonical Oyster cluster phenotype.
d3dcomplx grew these King Oyster thick stem phenotype Black Pearl Oysters from a Ready-to-Fruit block
_________________________________________________________________________________________
Blue Oyster block- Instructions for use:
This information is specific to Blue Oyster.
- Check your block upon arrival to make sure there are no tears or signs of mold from shipping. If the block has broken into pieces during shipping, gently press the block together and let sit 4-7 days undisturbed (ideally in the dark) before moving to step 2.
- Slice a 1-2″ slit into the bag or a 1″ “X” into the side of the block. Be careful not to cut into the block itself and just cut the plastic. If there are trapped mushroom ‘pins’ under the plastic, consider making the cut so they can grow out.
- Fold down the top of the bag and deflate the block, tape the top down so that there is minimal room between the block and plastic except where the cut was made.
- Place the Ready-to-Fruit block in the most humid part of your home (not in direct sunlight) or in a grow chamber or grow tent. The kitchen is a good household place in lieu of a dedicated fruiting chamber. Blue oyster fruits best between 50-60°F but may fruit at ~50-70°F. The color will be more blue at lower temperatures.
Note: If your fruiting conditions are on the 60-70°F side, consider leaving the block in a cooler part of your home (50-60°F) until pinning begins (see below) then moving back to the warmer temp. It is also possible to induce pinning with a “cold shock”- move the block to the fridge for 12-24 hours in a spot where it will not freeze and then move into fruiting conditions.
Search online for easy to make fruiting chambers: monotubs, shot gun fruiting chambers (SGFCs) and tents with foggers/humidifiers are all great options and will likely increase success in fruiting and producing healthy fruits. Even a trash bag with plenty of holes can be used to increase humidity! If the Blue oysters produced in a fruiting chamber have large stems and small caps, more air exchange is needed. - 2X daily (or more if your environment is dry) spritz the plastic with filtered/distilled water where the cut was made and look for mushroom “pins”. These are the start of mushrooms! Pins should take ~1-2 weeks to develop from the time of opening the bag.
- Continue to mist the fruits and plastic while they grow. Blue Oysters are usually ready to harvest ~3-7 days after pins form and should be harvested before the caps flatten out or become concave for tastiest results. If the mushrooms are producing white spores (look for a white dust on the surface below the cap) than it is time to harvest.
- Cut the mushroom cluster from the block and enjoy for your next meal!
- Soak the block in fresh, cold, distilled/filtered water for 1-6 hours while inside the bag (pour into the opening) and then drain
- Put block back into fruiting conditions, you should get at least 1 more “flush” of mushrooms from the block. If pins do not form at the cut site, consider opening the plastic at the site of the largest set of pins for subsequent flushes and sealing the original site with tape.
_________________________________________________________________________________________
Chestnut block- Instructions for use:
This information is specific to Chestnut Mushrooms.
- Check your block upon arrival to make sure there are no tears or signs of mold from shipping. If the block has broken into pieces during shipping, gently press the block together and let sit 4-7 days undisturbed (ideally in the dark) before moving to step 2.
- Slice a 1-2″ slit into the bag or a 1″ “X” into the side of the block. Be careful not to cut into the block itself and just cut the plastic. If there are trapped mushroom ‘pins’ under the plastic, consider making the cut so they can grow out.
- Fold down the top of the bag and deflate the block, tape the top down so that there is minimal room between the block and plastic except where the cut was made.
- Place the Ready-to-Fruit block in the most humid part of your home (not in direct sunlight) or in a grow chamber or grow tent. The kitchen is a good household place in lieu of a dedicated fruiting chamber. Chestnut Mushrooms fruit best between 60-70°F.
Search online for easy to make fruiting chambers: monotubs, shot gun fruiting chambers (SGFCs) and tents with foggers/humidifiers are all great options and will likely increase success in fruiting and producing healthy fruits. Even a trash bag with plenty of holes can be used to increase humidity! - 2X daily (or more if your environment is dry) spritz the plastic with filtered/distilled water where the cut was made and look for mushroom “pins”. These are the start of mushrooms! Pins should take ~1-4 weeks to develop from the time of opening the bag.
- Continue to mist the fruits and plastic while they grow. Chestnut Mushrooms are usually ready to harvest 5-10 days after pins form and should be harvested before the caps flatten out or become concave for tastiest results and best storage. See below images for an example of when to harvest. Figure 1: The mushrooms could go another 12-24 hours before harvesting in this photo but will be more tender. Figure 2: A perfect time to harvest! Photos of fruits grown by Brian from MMM Chestnut culture.
- Cut the mushroom cluster from the block and enjoy for your next meal!
- Soak the block in fresh, cold, distilled/filtered water for 1-6 hours while inside the bag (pour into the opening) and then drain.
- Put block back into fruiting conditions, you should get at least 1 more “flush” of mushrooms from the block. If pins do not form at the cut site, consider opening the plastic at the site of the largest set of pins for subsequent flushes and sealing the original site with tape.
Figure 1:
Figure 2:
_________________________________________________________________________________________
Ganoderma multipileum block- Instructions for use:
This information is specific to Ganoderma multipileum.
- Check your block upon arrival to make sure there are no tears or signs of mold from shipping. If the block has broken into pieces during shipping, gently press the block together and let sit 3-5 days undisturbed before moving to step 2.
Ganoderma multipileum has notoriously leathery and sometimes yellowish mycelium.
For antlers (Highly recommended for this species), go to step 2
For conks, go to step 3 - (For antlers) Pull the top of the bag up so that it sits upright as much as possible and inflates with air. You want to generate a lot of headspace above the surface of the substrate.- Go to step 5
- (For conks) Slice a 1-2″ slit into the bag or a 1″ “X” into the side of the block. Be careful not to cut into the block itself and just cut the plastic. If there are trapped mushroom ‘pins’ under the plastic, consider making the cut so they can grow out.
- Fold down the top of the bag and deflate the block, tape the top down so that there is minimal room between the block and plastic except where the cut was made.
- Place the Ready-to-Fruit block in the most humid part of your home (not in direct sunlight) or in a grow chamber or grow tent. The kitchen is a good household place in lieu of a dedicated fruiting chamber. Ganoderma multipileum fruits best between 70-85°F but will grow (albeit slowly!) as low as the 50s.
Search online for easy to make fruiting chambers: monotubs, shot gun fruiting chambers (SGFCs) and tents with foggers/humidifiers are all great options and will likely increase success in fruiting and producing healthy fruits. Even a trash bag with plenty of holes can be used to increase humidity!
Antlers are produced inside the bag, they will grow towards the light source. They do not need to be kept in a humid environment or spritzed. Eventually the top of the bag can be cut and put into a fruiting chamber (step 7) and conks will form if that is what is wanted- this method of antlers then opening the bag to let them conk is highly recommended for this species. - If cut, spritz the plastic with distilled/filtered water where the cut was made 2X daily (or more if your environment is dry) and look for mushroom “pins”. These are the start of mushrooms! Pins should take ~2-3 weeks to develop from the time of opening the bag and will look like a white/yellow blob that grows outside the opening. Antlers will look like white/yellow blobs forming on the top surface of the block, towards the top where the air is.
- If cut, continue to mist the fruits and plastic while they grow. Ganoderma multipileum are slow growing and are usually ready to harvest 6-8 weeks after pins form and should be harvested before too many spores are produced (conks) or when the antlers lose the white tips and stop growing or begin to grow and conk outside the filter patch.
- Cut the conk or antler cluster from the block and enjoy as a tincture or as a dried supplement (see below warning).
- Soak the block in fresh distilled/filtered water for 1-6 hours while inside the bag (pour into the opening) and then drain from the bag.
- Put block back into fruiting conditions, you should get at least 1 more “flush” of mushrooms from the block. If pins do not form at the cut site, consider opening the plastic at the site of the largest set of pins for subsequent flushes

2-3 weeks growth from full colonization, antlers forming in vitro.
5-6 weeks growth from full colonization, antlers forming in vitro (bag was rolled down for photo).
8-9 weeks growth from full colonization, antlers forming in vitro (bag was rolled down for photo).
~14 weeks growth from full colonization, antlers formed in vitro until ~9 weeks, and were grown in monotub since.
_________________________________________________________________________________________
King Oyster block- Instructions for use:
This information is specific to King Oyster.
-
- Check your block upon arrival to make sure there are no tears or signs of mold from shipping. If the block has broken into pieces during shipping, gently press the block together and let sit 4-7 days undisturbed (ideally in the dark) before moving to step 2.
- Cut open the bag as close to the seal as possible. Fill the bag with air and gently fold over the top a single time and use 1 paperclip (or similar) in the center to keep the bag closed and relatively inflated with air.
- Place the Ready-to-Fruit block in an area of your home that is between 55-65°F (ideally 55-60°F). Check the bag daily for baby mushroom pins growing at the top of the bag. See below image for example of pins.
- Fold the top of the bag down (or cut it) to ~2 inches from the top of the mushroom pins.
- Place the Ready-to-Fruit block in the most humid part of your home (not in direct sunlight) or in a grow chamber or grow tent. The kitchen is a good household place in lieu of a dedicated fruiting chamber (as long as it is cold enough). King Oyster fruits best between 55-65°F.
Search online for easy to make fruiting chambers: monotubs, shot gun fruiting chambers (SGFCs) and tents with foggers/humidifiers are all great options and will likely increase success in fruiting and producing healthy fruits. Even a clear trash bag with plenty of holes can be used to increase humidity! King Oysters are prized for their thick meaty stems produced when they have less air exchange, more air exchange will lead to larger caps which are still delicious. - 2X daily (or more if your environment is dry) spritz the plastic sides and mushrooms with filtered/distilled water. Try to use a fine spray and not leave pools of water on the mushrooms. If they are drying out spray more than 2X per day.
- Continue to mist the fruits and plastic while they grow. King Oysters are usually ready to harvest 4-7 days after pins form and the top is folded/cut and should be harvested before the caps flatten out or become concave for tastiest results.
- Cut the mushroom cluster from the block and enjoy for your next meal! Checkout those King Oyster Scallops MMM made in the photo below.
- Soak the block in fresh, cold, distilled/filtered water for 1-6 hours while inside the bag (pour into the opening) and then drain.
- Put block back into fruiting conditions, you should get at least 1 more “flush” of mushrooms from the block.

King Oyster Pinset
King Oysters grown my MMM- This is the more canonical phenotype for Kings.
King Oyster grow by Nathan Murphy
King Oyster “Scallops” made from the infamous thick stem of King Oysters
_________________________________________________________________________________________
Lion’s Mane & Lion’s Mane (High Temperature Tolerant) block- Instructions for use:
This information is specific to Lion’s Mane.
- Check your block upon arrival to make sure there are no tears or signs of mold from shipping. If the block has broken into pieces during shipping, gently press the block together and let sit 4-7 days undisturbed (ideally in the dark) before moving to step 2.
Lion’s mane has notoriously thin and wispy mycelium, if the block appears uncolonized let it sit 2-4 days and it should begin to whiten. - Slice a 1-2″ slit into the bag or a 1″ “X” into the side of the block. Be careful not to cut into the block itself and just cut the plastic. If there are mushroom pins, consider creating the opening around a group of pins (see below image).
- Fold down the top of the bag and deflate the block, tape the top down so that there is minimal room between the block and plastic except where the cut was made.
- Place the Ready-to-Fruit block in the most humid part of your home (not in direct sunlight) or in a grow chamber or grow tent. The kitchen is a good household place in lieu of a dedicated fruiting chamber. Lion’s Mane fruits best between 60-75°F (60-85°F for the High Temperature Tolerant culture).
Search online for easy to make fruiting chambers: monotubs, shot gun fruiting chambers (SGFCs) and tents with foggers/humidifiers are all great options and will likely increase success in fruiting and producing healthy fruits. Even a trash bag with plenty of holes can be used to increase humidity! If the Lion’s Mane produced in a fruiting chamber have large stems and long thin teeth, more air exchange is needed. - 2X daily (or more if your environment is dry) spritz the plastic with distilled/filtered water where the cut was made and look for mushroom “pins”. These are the start of mushrooms! Pins should take ~1-2 weeks to develop from the time of opening the bag.
- Continue to mist the fruits and plastic while they grow. Lion’s Mane are usually ready to harvest ~7-14 days after pins form and should be harvested before the teeth elongate too much and produce spores for tastiest results (see below image).
- Cut the mushroom cluster from the block and enjoy for your next meal!
- Soak the block in fresh distilled/filtered water for 1-6 hours while inside the bag (pour into the opening) and then drain from the bag.
- Put block back into fruiting conditions, you should get at least 1 more “flush” of mushrooms from the block. If pins do not form at the cut site, consider opening the plastic at the site of the largest set of pins for subsequent flushes and sealing the original site with tape.
Lion’s Mane pin formation:
Lion’s Mane fruits at good time to pick. Might have been best to go 1 day more for slightly more growth.

_________________________________________________________________________________________
Hen of the Woods/HOTW/Maitake block- Instructions for use:
This information is specific to Hen of the Woods/HOTW/Maitake.
- Check your block upon arrival to make sure there are no tears or signs of mold from shipping. If the block has broken into pieces during shipping, gently press the block together and let sit 3-5 days undisturbed before moving to step 2.
- Pull the top of the bag upwards and allow the headspace to fill with air to create an open space around the top of the block. If necessary, cut a small hole to allow air into the bag and tape shut. The block should be sitting with the filter patch at the top sitting up.
- Place the block in indirect sunlight in a 50-60°F location and allow primordia (the start of mushrooms) to form at the surface. Primordia will be dark gray/brown in color and form almost growths that will develop over 4-8 weeks.
- Once the primordia have formed, cut the top of the bag at the seal. Place the Ready-to-Fruit block in the most humid part of your home (not in direct sunlight but indirect sunlight is required) or in a grow chamber/fruiting chamber or grow tent. The kitchen is a good household place in lieu of a dedicated fruiting chamber but HOTW does best with a high and relatively stable humidity that a fruiting chamber provides. Hen of the Woods fruits best between 55-65°F.
Search online for easy to make fruiting chambers: monotubs, shot gun fruiting chambers (SGFCs) and tents with foggers/humidifiers are all great options and will likely increase success in fruiting and producing healthy fruits. Even a trash bag with plenty of holes can be used to increase humidity! - 2X daily (or more if your environment is dry) spritz the plastic with filtered/distilled water where the cut was made and watch the mushrooms form from the primordia. Avoid getting the substrate inside the block too wet and do not let mushrooms get wet. Mushrooms should never be wet for more than 1-2 hours after misting to avoid bacterial issues. The bag/fruiting chamber should be retaining the humidity.
- Continue to mist the plastic while they grow or retain in a humid fruiting chamber. Every ~ 2 weeks, roll down about ~1/3 of the bag such that, after 6 weeks the mushrooms and top of the block are exposed. Hen of the Woods are usually ready to harvest 6-8 weeks after primordia form and should be harvested before the caps flatten out or become concave for tastiest results. If a fruiting chamber is not being used, do not roll the plastic below the mushroom cluster to try and retain humidity. If the mushrooms begin to dry out, harvest early.
- Cut the mushroom cluster from the block and enjoy for your next meal!
- Soak the block in fresh, cold, distilled/filtered water for 1-6 hours while inside the bag (pour into the opening) and then drain
- Put block back into fruiting conditions by rolling up the bag, sealing with a zip-tie or rubber band and beginning from step 2. You should get at least 1 more “flush” of mushrooms from the block.
- Once the block is done producing or if there are any issues getting mushrooms to grow, put the block outside (remove plastic) in a shaded area that is moist (low to the ground is best). There is a good chance your block will produce mushrooms outdoors if conditions are right. Consider soaking the block if it gets too dry.


Start of pinning: side view and top view. Primordia- “bubbling” and grayish growths
Grown by Nathan Murphy (Western PA) between 70-80°F and 85-95% humidity with temp/humidity spikes (air drawn from outside). NM says the strain is “merciful” to wide ranged conditions.
_________________________________________________________________________________________
Nameko- Instructions for use:
This information is specific to Nameko.
- Check your block upon arrival to make sure there are no tears or signs of mold from shipping. If the block has broken into pieces during shipping, gently press the block together and let sit 4-7 days undisturbed (ideally in the dark) before moving to step 2.
- Cut open the bag as close to the seal as possible. Fill the bag with air and gently fold over the top a single time and use 1 paperclip (or similar) in the center to keep the bag closed and relatively inflated with air.
- Place the Ready-to-Fruit block in an area of your home that is between 50-65°F. Check the bag daily for baby mushroom pins growing at the top of the bag.
- Once the top is pinning extensively and the pins are 1-2 inches tall, fold the top of the bag down (or cut it) to ~2-4 inches from the top of the mushroom pins. See below image for example of size of pins at this stage.
- Place the Ready-to-Fruit block in the most humid part of your home (not in direct sunlight) or in a grow chamber or grow tent. The kitchen is a good household place in lieu of a dedicated fruiting chamber (as long as it is cold enough). Nameko fruits best between 50-65°F.
Search online for easy to make fruiting chambers: monotubs, shot gun fruiting chambers (SGFCs) and tents with foggers/humidifiers are all great options and will likely increase success in fruiting and producing healthy fruits. Even a clear trash bag with plenty of holes can be used to increase humidity! - 2X daily (or more if your environment is dry) spritz the plastic sides and mushrooms with filtered/distilled water. Try to use a fine spray and not leave pools of water on the mushrooms. If they are drying out spray more than 2X per day. Nameko require high humidity to continue growing and may require a fruiting chamber (see above) for best results
- Continue to mist the fruits and plastic while they grow. Nameko are usually ready to harvest 5-10 days after pins form and the top is folded/cut and should be harvested before the caps flatten out or become concave for tastiest results. Nameko have a slightly slimy top naturally, this is not a cause for alarm.
- Cut the mushroom cluster(s) from the block and enjoy for your next meal!
- To try for a second flush, Let the block sit for 1 week with the top folded and clipped as in step 2.
- Soak the block in fresh, cold, distilled/filtered water for 0.5-1 hour while inside the bag (pour into the opening) and then drain thoroughly.
- Put block back into fruiting conditions, you should get at least 1 more “flush” of mushrooms from the block.

Pin size at stage of opening bag for fruiting.
Growth of ~7 days from above pin picture. Temps ~50-55°F. This was a few days before harvest, largest caps had veils ripped.
_________________________________________________________________________________________
Pearl Oyster block- Instructions for use:
This information is specific to Pearl Oyster.
- Check your block upon arrival to make sure there are no tears or signs of mold from shipping. If the block has broken into pieces during shipping, gently press the block together and let sit 4-7 days undisturbed (ideally in the dark) before moving to step 2.
- Slice a 1-2″ slit into the bag or a 1″ “X” into the side of the block. Be careful not to cut into the block itself and just cut the plastic. If there are trapped mushroom ‘pins’ under the plastic, consider making the cut so they can grow out.
- Fold down the top of the bag and deflate the block, tape the top down so that there is minimal room between the block and plastic except where the cut was made.
- Place the Ready-to-Fruit block in the most humid part of your home (not in direct sunlight) or in a grow chamber or grow tent. The kitchen is a good household place in lieu of a dedicated fruiting chamber. Pearl oyster fruits best between 65-75°F.
Search online for easy to make fruiting chambers: monotubs, shot gun fruiting chambers (SGFCs) and tents with foggers/humidifiers are all great options and will likely increase success in fruiting and producing healthy fruits. Even a trash bag with plenty of holes can be used to increase humidity! If the pearl oysters produced in a fruiting chamber have large stems and small caps, more air exchange is needed. - 2X daily (or more if your environment is dry) spritz the plastic with distilled/filtered water where the cut was made and look for mushroom “pins”. These are the start of mushrooms! Pins should take ~1-2 weeks to develop from the time of opening the bag.
- Continue to mist the fruits and plastic while they grow. Pearl Oysters are usually ready to harvest ~3-7 days after pins form and should be harvested before the caps flatten out or become concave for tastiest results.
- Cut the mushroom cluster from the block and enjoy for your next meal!
- Soak the block in fresh, cold, distilled/filtered water for 1-6 hours while inside the bag (pour into the opening) and then drain
- Put block back into fruiting conditions, you should get at least 1 more “flush” of mushrooms from the block. If pins do not form at the cut site, consider opening the plastic at the site of the largest set of pins for subsequent flushes and sealing the original site with tape.

The culture is so aggressive it escaped the filter patch and started fruiting in MMMs lab!
Grown by MMM
Grown by Happy Customer
_________________________________________________________________________________________
Pink Oyster block- Instructions for use:
This information is specific to Pink Oyster.
- Check your block upon arrival to make sure there are no tears or signs of mold from shipping. If the block has broken into pieces during shipping, gently press the block together and let sit 4-7 days undisturbed (ideally in the dark) before moving to step 2.
- Slice a 1-2″ slit into the bag or a 1″ “X” into the side of the block. Be careful not to cut into the block itself and just cut the plastic. If the block is pinning (see below image), make your cut so the pins are freed and can begin to grow.
- Fold down the top of the bag and deflate the block, tape the top down so that there is minimal room between the block and plastic except where the cut was made.
- Place the Ready-to-Fruit block in the most humid part of your home (not in direct sunlight) or in a grow chamber or grow tent. The kitchen is a good household place in lieu of a dedicated fruiting chamber. Pink oyster fruits best between 70-95°F.
Search online for easy to make fruiting chambers: monotubs, shot gun fruiting chambers (SGFCs) and tents with foggers/humidifiers are all great options and will likely increase success in fruiting and producing healthy fruits. Even a trash bag with plenty of holes can be used to increase humidity! If the pink oysters produced in a fruiting chamber have large stems and small caps, more air exchange is needed. - 2X daily (or more if your environment is dry) spritz the plastic with distilled/filtered where the cut was made and look for mushroom “pins”. These are the start of mushrooms! Pins should take ~1-2 weeks to develop from the time of opening the bag- see below image.
- Continue to mist the fruits and plastic while they grow. Pink Oysters are usually ready to harvest ~5-10 days after pins form and should be harvested before the caps flatten out or become concave for tastiest results.
- Cut the mushroom cluster from the block and enjoy for your next meal!
- Soak the block in fresh, cold, distilled/filtered water for 1-6 hours while inside the bag (pour into the opening) and then drain
- Put block back into fruiting conditions, you should get at least 1 more “flush” of mushrooms from the block. If pins do not form at the cut site, consider opening the plastic at the site of the largest set of pins for subsequent flushes and sealing the original site with tape.

Pink Oyster Pins
3 Days from Pins- Young Pink Oyster Cluster
5 Days from Pins- Pink Oyster Cluster before harvest
_________________________________________________________________________________________
Pioppino block- Instructions for use:
This information is specific to Pioppino.
- Check your block upon arrival to make sure there are no tears or signs of mold from shipping. If the block has broken into pieces during shipping, gently press the block together and let sit 4-7 days undisturbed (ideally in the dark) before moving to step 2.
- Cut open the bag as close to the seal as possible. Fill the bag with air and gently fold over the top a single time and use 1 paperclip (or similar) in the center to keep the bag closed and relatively inflated with air.
- Place the Ready-to-Fruit block in an area of your home that is between 55-70°F (ideally 55-60°F). Check the bag daily for baby mushroom pins growing at the top of the bag.
- Once the top is pinning extensively and the pins are 1-2 inches tall, fold the top of the bag down (or cut it) to ~2-4 inches from the top of the mushroom pins. See below Image 1.
- Place the Ready-to-Fruit block in the most humid part of your home (not in direct sunlight) or in a grow chamber or grow tent. The kitchen is a good household place in lieu of a dedicated fruiting chamber (as long as it is cold enough). Pioppino fruits best between 55-65°F.
Search online for easy to make fruiting chambers: monotubs, shot gun fruiting chambers (SGFCs) and tents with foggers/humidifiers are all great options and will likely increase success in fruiting and producing healthy fruits. Even a clear trash bag with plenty of holes can be used to increase humidity! - 2X daily (or more if your environment is dry) spritz the plastic sides and mushrooms with filtered/distilled water. Try to use a fine spray and not leave pools of water on the mushrooms. If they are drying out spray more than 2X per day.
- Continue to mist the fruits and plastic while they grow (See below Images 2-3). Pioppino are usually ready to harvest 5-10 days after pins form and the top is folded/cut and should be harvested before the caps flatten out or become concave for tastiest results.
- Cut the mushroom cluster(s) from the block and enjoy for your next meal!
- To try for a second flush, Let the block sit for 1 week with the top folded and clipped as in step 2.
- Soak the block in fresh, cold, distilled/filtered water for 0.5-1 hour while inside the bag (pour into the opening) and then drain thoroughly.
- Put block back into fruiting conditions, you should get at least 1 more “flush” of mushrooms from the block (See below Image 4).

Image 1) Bag opened for air to let pinset grow

Image 2) 1 Day after bag opened for air to let pinset grow

Image 3) 2 Days after bag opened for air to let pinset grow

Image 4) Second flush from same block
_________________________________________________________________________________________
Red Reishi block- Instructions for use:
This information is specific to Red Reishi.
- Check your block upon arrival to make sure there are no tears or signs of mold from shipping. If the block has broken into pieces during shipping, gently press the block together and let sit 4-7 days undisturbed (ideally in the dark) before moving to step 2.
Red Reishi has notoriously leathery and sometimes yellowish mycelium.
For antlers, go to step 2
For conks, go to step 3 - (For antlers) Pull the top of the bag up so that it sits upright as much as possible.- Go to step 5
- (For conks) Slice a 1-2″ slit into the bag or a 1″ “X” into the side of the block. Be careful not to cut into the block itself and just cut the plastic. If there are trapped mushroom ‘pins’ under the plastic, consider making the cut so they can grow out.
- Fold down the top of the bag and deflate the block, tape the top down so that there is minimal room between the block and plastic except where the cut was made.
- Place the Ready-to-Fruit block in the most humid part of your home (not in direct sunlight) or in a grow chamber or grow tent. The kitchen is a good household place in lieu of a dedicated fruiting chamber. Red Reishi fruits best between 70-85°F but will grow (albeit slowly!) as low as the 50s.
Search online for easy to make fruiting chambers: monotubs, shot gun fruiting chambers (SGFCs) and tents with foggers/humidifiers are all great options and will likely increase success in fruiting and producing healthy fruits. Even a trash bag with plenty of holes can be used to increase humidity!
Antlers are produced inside the bag, they will grow towards the light source. They do not need to be kept in a humid environment or spritzed. Eventually the top of the bag can be cut and put into a fruiting chamber and conks will form if that is what is wanted. - If cut, spritz the plastic with distilled/filtered water where the cut was made 2X daily (or more if your environment is dry) and look for mushroom “pins”. These are the start of mushrooms! Pins should take ~2-3 weeks to develop from the time of opening the bag and will look like a white/yellow blob that grows outside the opening. Antlers will look like white/yellow blobs forming on the top surface of the block, towards the top where the air is.
- If cut, continue to mist the fruits and plastic while they grow. Red reishi are slow growing and are usually ready to harvest 6-8 weeks after pins form and should be harvested before too many spores are produced (conks) or when the antlers lose the white tips and stop growing or begin to grow and conk outside the filter patch.
- Cut the conk or antler cluster from the block and enjoy as a tincture or as a dried supplement (see below warning).
- Soak the block in fresh distilled/filtered water for 1-6 hours while inside the bag (pour into the opening) and then drain from the bag.
- Put block back into fruiting conditions, you should get at least 1 more “flush” of mushrooms from the block. If pins do not form at the cut site, consider opening the plastic at the site of the largest set of pins for subsequent flushes and sealing the original site with tape.

Red Reishi grown by Chae Rennie fruited around 68-72°F after ~6 weeks!
Red Reishi blocks grown by a Happy Customer.
_________________________________________________________________________________________
Shiitake Block- Instructions for use:
This information is specific to Shiitake.
- Check your block upon arrival to make sure there are no tears or signs of mold from shipping. If the block has broken into pieces during shipping, gently press the block together and let sit 4-7 days undisturbed (ideally in the dark) before moving to step 2.
- Let the block finish maturing.
- After 1-6 weeks the block will begin to “popcorn” where bulbs form on the outside and it may also begin to brown on the outside (sometimes getting nearly completely brown). See photos below for example of “popcorning”.
- Induce pinning: To induce pinning the best option is to first slap the block and then put into the fridge for 12-24 hours (a “cold shock”). Literally slap the block on all sides (this is thought to stimulate a dead tree falling and is a practice used for centuries!) and put in a part of the fridge where it will not freeze. If a fridge is not available than try to move the blocks to the coldest room of your home, a garage/basement/crawl space, or even possibly outside it should be sufficient. You want the blocks to get at least 5-10°F less than where they will be fruiting.
- Once the block has been cold shocked, let sit at room temp for 24 hours. After 24 hours at room temp, remove the block from the bag entirely and place into fruiting conditions. Consider doing this over your sink and rinsing the block with cold water if there is any liquid in the bag.
- Place the Ready-to-Fruit block in the most humid part of your home (not in direct sunlight) or in a grow chamber or grow tent. The kitchen is a good household place in lieu of a dedicated fruiting chamber. Shiitake fruits best between 60-70°F but may fruit at ~50-75/80°F.
Search online for easy to make fruiting chambers: monotubs, shot gun fruiting chambers (SGFCs) and tents with foggers/humidifiers are all great options and will likely increase success in fruiting and producing healthy fruits. Even a trash bag with plenty of holes can be used to increase humidity! - 2X daily (or more if your environment is dry) spritz the block with filtered/distilled water and look for mushroom “pins”. These are the start of mushrooms! Pins should take ~3-14 days to develop after the cold shock. See below for example of pins and what they look like.
- Continue to mist the fruits and block while they grow. Shiitake are usually ready to harvest ~4-10 days after pins form and should be harvested before the caps flatten out and begin to drop spores. Earlier harvesting (once the cap opens) can be ideal as the fruits are tastier and less fibrous, but it will decrease yields. See below for example on mushrooms ready for harvest.
- Cut the mushrooms from the block and enjoy for your next meal!
- To get another flush of mushrooms, allow the block to dry out for 2-4 weeks. It should be done in an area where the block is exposed (like a wire rack) or turn the block every 1-3 days to avoid moisture building on the bottom. The block should nearly completely dry out.
- After the block is dried, Soak the block in fresh, cold, distilled/filtered water for ~24 hours. You may need to put a heavy plate on the block to submerge it.
- After 24 hours soak, slap each side of the block and put the block back into fruiting conditions; you should get at least 1 more “flush” of mushrooms from the block.
3. “Popcorning”

7. These pins formed in the bag after they were kept in my basement as winter was approaching and temps dropped.
8: Image below is from @fungi_am_i who grew this culture around 71°F:
_________________________________________________________________________________________
Sporeless Oyster Block- Instructions for use:
This information is specific to Sporeless Oyster.
- Check your block upon arrival to make sure there are no tears or signs of mold from shipping. If the block has broken into pieces during shipping, gently press the block together and let sit 4-7 days undisturbed (ideally in the dark) before moving to step 2.
- Slice a 1-2″ slit into the bag or a 1″ “X” into the side of the block. Be careful not to cut into the block itself and just cut the plastic. If there are trapped mushroom ‘pins’ under the plastic, consider making the cut so they can grow out.
- Fold down the top of the bag and deflate the block, tape the top down so that there is minimal room between the block and plastic except where the cut was made.
- Place the Ready-to-Fruit block in the most humid part of your home (not in direct sunlight) or in a grow chamber or grow tent. The kitchen is a good household place in lieu of a dedicated fruiting chamber. Sporeless oyster fruits best between 55-70°F but may fruit at ~50-75°F.
Search online for easy to make fruiting chambers: monotubs, shot gun fruiting chambers (SGFCs) and tents with foggers/humidifiers are all great options and will likely increase success in fruiting and producing healthy fruits. Even a trash bag with plenty of holes can be used to increase humidity! If the Sporeless oysters produced in a fruiting chamber have large stems and small caps, more air exchange is needed. - 2X daily (or more if your environment is dry) spritz the plastic with filtered/distilled water where the cut was made and look for mushroom “pins”. These are the start of mushrooms! Pins should take ~1-2 weeks to develop from the time of opening the bag.
- Continue to mist the fruits and plastic while they grow. Sporeless Oysters are usually ready to harvest ~3-7 days after pins form and should be harvested before the caps flatten out or become concave for tastiest results.
- Cut the mushroom cluster from the block and enjoy for your next meal!
- Soak the block in fresh, cold, distilled/filtered water for 1-6 hours while inside the bag (pour into the opening) and then drain
- Put block back into fruiting conditions, you should get at least 1 more “flush” of mushrooms from the block. If pins do not form at the cut site, consider opening the plastic at the site of the largest set of pins for subsequent flushes and sealing the original site with tape.

Sporeless oyster cluster grown by pleasuretek around 55°F. Verified no spore production with an 11.5 hour print attempt.
A beautiful sporeless oyster cluster grown by Coontailblue23
_________________________________________________________________________________________
Turkey Tail block- Instructions for use:
This information is specific to Turkey Tail.
- Check your block upon arrival to make sure there are no tears or signs of mold from shipping. If the block has broken into pieces during shipping, gently press the block together and let sit 3-5 days undisturbed before moving to step 2 or 3.
For rosettes, go to step 2
For shelves, go to step 3 - (For rosettes) Pull the top of the bag up so that it sits upright as much as possible.
Let sit at room temperature until white and yellowish/brownish mycelium lumps (primordia) form at the top of the block (see below image). This will take 1-4 weeks.
Fold the top of the bag down (or cut it) to ~1 inches from the top of the mushroom primordia.
– Go to step 5 - (For shelves) Slice 2 or 3 slits into the side of the bag or a 1″ “X” into the side of the block. If cutting slits they should be equally spaced and take up about 80% of the bag length (see below image with 4 slits for an idea- this is a block made by a customer with MMM’s turkey tail culture and is larger than this item which is a 3 lb block). Be careful not to cut into the block itself and just cut the plastic.
- Fold down the top of the bag and deflate the block, tape the top down so that there is minimal room between the block and plastic except where the cut was made.
- Place the Ready-to-Fruit block in the most humid part of your home (not in direct sunlight) or in a grow chamber or grow tent. The kitchen is a good household place in lieu of a dedicated fruiting chamber. Turkey Tail fruits best between 65-75°F but will grow from ~50-85°F but time and form may differ at the extremes.
Search online for easy to make fruiting chambers: monotubs, shot gun fruiting chambers (SGFCs) and tents with foggers/humidifiers are all great options and will likely increase success in fruiting and producing healthy fruits. Even a trash bag with plenty of holes can be used to increase humidity! - Spritz the plastic with distilled/filtered water where the cut was made or at the top of the block 2X daily (or more if your environment is dry) and look for mushroom primordia. These are the start of mushrooms! Primordia should take ~2 weeks to develop from the time of slicing open the bag (shelves only, rosette primordia should be formed before opening the bag, see step 2).
- Continue to mist the fruits and plastic while they grow. Turkey Tail are slow growing and are usually ready to harvest 3-8 weeks after primordia form and should be harvested while the undersides are still white.
- Cut the cluster from the block and enjoy as a tincture, tea, or as a dried supplement (see below warning).
- Soak the block in fresh distilled/filtered water for 1-6 hours while inside the bag (pour into the opening) and then drain from the bag.
- Put block back into fruiting conditions, you should get at least 1 more “flush” of mushrooms from the block. If pins do not form at the cut site, consider opening the plastic at the site of the largest set of pins for subsequent flushes and sealing the original site with tape.

Primordia formation in vitro. Rosettes will continue to form from the primordia or shelves will form if plastic cut along side

Shelves grown by Knives V. Wolfram
_________________________________________________________________________________________
Instructions for use:
This information is specific to Winecap.
- Check your block upon arrival to make sure there are no tears or signs of mold from shipping.
- Prepare your Winecap bed. I recommend 1 3lb spawn bag per 25 square feet. Winecap beds are best produced on or around existing woodchip/mulch beds and in the shade.
Winecap beds prepared in Spring after frost concerns generally produce late Summer and Fall and Late Summer/Fall prepared beds tend to fruit in Spring/Summer of the following year. Beds can be “fed” yearly with a new layer of straw and woodchips to continue to produce. A single bed produced as described below, should produce for at least 1-2 year(s) (2-4 fruiting seasons). - Gather bed materials- hardwood woodchips and straw are recommended. Presoaked is ideal, but you can soak as you create the bed.
- Rake out bed to soil level if not being put on existing woodchips/mulch. There should not be plants or weeds for best results.
- Put a layer of woodchips, about 1-2″ deep as base layer.
- Add a thin layer of straw.
- Add a thin layer of Winecap spawn. Break it into small pieces and spread, it does not need to be a perfect even layer.
- Add a thin layer of woodchips, a thin layer of straw and a thin layer of spawn. Top with a layer of woodchips that covers the bed fairly completely and evenly.
- Soak the bed with water.
- Continue to keep the bed moist, it should be watered on days without rain and when hot/dry. Drip systems can be best. There inside of the bed should remain moist- if the top layer is dry it likely is due for a watering.
Consider checking on the bed about 1 per week when first made. You can gently dig into a portion of the bed to see if white mycelium is growing from the spawn into the straw and woodchips. - After 2-11 months, the bed will produce mushrooms! They can be picked before the cap opens (“buttons”) or, after 1-2 more days, once the cap is opened.
Please be mindful of Winecap identification. There is always a chance for other species to grow out of the bed. You are responsible for what is put in your body, make sure you are picking and eating Winecap. I strongly recommend looking at a guide and looking at photos on the internet to correctly identify. Wikipedia is a good source to start.
We are currently accepting photographs of any of the above steps for clarification for future customers, including photos of beds, fruits etc. Thank you! - Yearly, usually in the spring, it is recommended to “feed” the bed to allow continued production without diminishing returns. This is best done by adding a new layer of spawn, straw then woodchips to the top of a bed. One can also gently mix some of the top of the bed into a fresh straw layer, and then add a layer of woodchips, but adding fresh spawn is ideal.
_________________________________________________________________________________________
Instructions for use:
This information is specific to Yellow Oyster.
- Check your block upon arrival to make sure there are no tears or signs of mold from shipping. If the block has broken into pieces during shipping, gently press the block together and let sit 3-5 days undisturbed before moving to step 2.
- Slice a 1-2″ slit into the bag or a 1″ “X” into the side of the block. Be careful not to cut into the block itself and just cut the plastic. If there are trapped mushroom ‘pins’ under the plastic, consider making the cut so they can grow out.
- Fold down the top of the bag and deflate the block, tape the top down so that there is minimal room between the block and plastic except where the cut was made.
- Place the Ready-to-Fruit block in the most humid part of your home (not in direct sunlight) or in a grow chamber or grow tent. The kitchen is a good household place in lieu of a dedicated fruiting chamber. Yellow Oyster fruits best between 75-80°F but may fruit at ~70-90°F (drop temp lower than 80°F to induce pinning before running at 85-90°F if possible.
Note: Search online for easy to make fruiting chambers: monotubs, shot gun fruiting chambers (SGFCs) and tents with foggers/humidifiers are all great options and will likely increase success in fruiting and producing healthy fruits. Even a trash bag with plenty of holes can be used to increase humidity! If the Yellow Oysters produced in a fruiting chamber have large stems and small caps, more air exchange is needed. - 2X daily (or more if your environment is dry) spritz the plastic with filtered/distilled water where the cut was made and look for mushroom “pins”. These are the start of mushrooms! Pins should take ~1-2 weeks to develop from the time of opening the bag.
- Continue to mist the fruits and plastic while they grow. Yellow Oysters are usually ready to harvest ~3-7 days after pins form and should be harvested before the caps flatten out or become concave for tastiest results. If the mushrooms are producing white spores (look for a white dust on the surface below the cap) then it is time to harvest.
- Cut the mushroom cluster from the block and enjoy for your next meal!
- Soak the block in fresh, cold, distilled/filtered water for 1-6 hours while inside the bag (pour into the opening) and then drain
- Put block back into fruiting conditions, you should get at least 1 more “flush” of mushrooms from the block. If pins do not form at the cut site, consider opening the plastic at the site of the largest set of pins for subsequent flushes and sealing the original site with tape.

MMM’s Yellow Oyster culture grown by Scott
MMM’s Yellow Oyster culture grown by Brian